
|
Getting your Trinity Audio player ready...
|
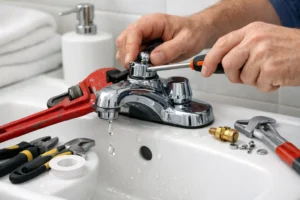
When you discover a problem with your sewer line, panic often follows. A broken sewer pipe is one of the most dreaded plumbing issues a homeowner can face. Not only can it lead to foul smells and slow drainage, but if left unchecked, it can also cause significant structural damage and environmental hazards. Fortunately, with the right knowledge and tools, repairing a broken sewer pipe doesn’t have to be a nightmare.
In this comprehensive guide, we’ll dive deep into how to repair a broken sewer pipe—from diagnosis to digging and sealing, whether you’re calling in a pro or attempting a do-it-yourself fix.
Understanding the Basics of a Sewer Pipe
Before jumping into repair techniques, it’s crucial to understand what a sewer pipe does and why it’s so important. A sewer pipe is responsible for carrying wastewater away from your home to the municipal sewage system or a private septic tank. When this pipe breaks, it disrupts the entire system, causing backups, leaks, and unpleasant odors, its time for sewer line repair from seasoned plumber near you.
Common Causes of Sewer Pipe Damage
- Tree root infiltration
- Aging and corrosion of metal pipes
- Ground movement or earthquakes
- Poor initial installation
- Heavy construction nearby
- Freezing and thawing cycles
Each of these issues can create cracks, disjointed pipes, or complete collapses—requiring immediate attention.
1. Tree root infiltration
Tree roots naturally seek moisture, and sewer pipes are like magnets for them. Over time, roots can break into tiny pipe cracks, grow inside, and block or burst the line. It’s one of the most common—and sneakiest—causes of pipe failure.
2. Aging and corrosion of metal pipes
Older metal pipes like cast iron or galvanized steel corrode over time. As they weaken, they become brittle and prone to cracking or collapsing. If your home’s plumbing is decades old, pipe aging could already be causing hidden trouble.
3. Ground movement or earthquakes
Soil shifts, whether from earthquakes or minor ground movement, can dislodge or snap sewer lines. Even if the motion is small, pipes can crack or pull apart at joints. Areas with unstable soil or seismic activity are especially at risk.
4. Poor initial installation
If sewer pipes weren’t properly installed from the start—wrong slope, loose joints, or poor materials—they’re more likely to fail early. Bad installation puts unnecessary stress on the system, often leading to leaks or full collapses over time.
5. Heavy construction nearby
Large construction equipment or deep digging near your property can shift the ground and damage underground pipes. Vibrations and soil compression can cause older lines to crack or separate. Always check for nearby construction activity if problems begin.
6. Freezing and thawing cycles
In colder regions, water inside the pipes can freeze, expand, and cause pipes to crack or burst. When the ground freezes and thaws repeatedly, it also puts pressure on the pipe’s exterior. This seasonal stress adds up fast over the years.
Signs You Have a Broken Sewer Pipe

A foul smell and dark leakage, like in the image, are clear signs of a broken sewer pipe. You may also notice slow drains, mold growth, or unusual wet spots on your walls or floors. Ignoring these symptoms can lead to serious health risks and costly damage. If you spot any of these signs, contact plumbing point inc for immediate inspection and repair.
Identifying the signs early can save you thousands of dollars. From foul odors to slow drains or soggy patches in your yard, these red flags shouldn’t be ignored. Spotting them early helps you act fast and prevent worse issues. The most common warning signs to watch out for are given below.
1. Slow-draining sinks, bathtubs, or toilets
If your drains are clearing out slower than usual, especially in multiple fixtures, it could point to a sewer line blockage. This often means the main pipe isn’t allowing waste to flow out properly. Don’t ignore this early warning—it can get messy fast.
2. Gurgling noises coming from drains
Strange bubbling or gurgling sounds from sinks or toilets can signal trapped air in the pipes. That usually happens when wastewater is struggling to pass through a clog or break. It’s one of the first signs that your sewer line might be compromised.
3. Sewage backups in the home
If water or waste comes back up into tubs, toilets, or floor drains, it’s a serious red flag. Backups typically mean your main sewer pipe is blocked or broken. This requires immediate attention to avoid contamination and costly damage.
4. Soggy or sunken patches in the yard
Unusual wet spots, sinking soil, or overly lush patches of grass might mean sewage is leaking underground. It’s a classic sign of a cracked or broken sewer line. Even if it’s not smelly yet, it needs to be looked at right away.
5. Mold or mildew near the base of walls
Moisture from a hidden sewer leak can seep into your walls or floors, creating the perfect breeding ground for mold. If you notice unexplained mildew or musty smells, especially on lower levels, your sewer line could be the hidden culprit.
6. Foul sewer smells inside or outside the house
Sewage has a very distinct and unpleasant odor that’s hard to miss. If that smell lingers around drains, the basement, or even your yard, it’s likely escaping from a damaged pipe. A healthy sewer system should never smell—get it checked immediately.
Inspection and Diagnosis of Sewer Pipe Damage
You can’t fix what you can’t see. Start with a thorough inspection to determine the location and severity of the damage.
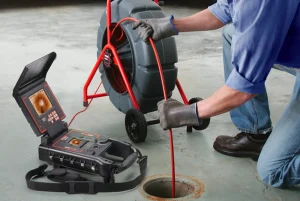
Use a Sewer Camera Inspection
Professional plumbers often use a sewer camera—a waterproof, high-resolution camera attached to a flexible rod—to inspect the line. It reveals blockages, breaks, and root invasions.
Dye Testing and Smoke Testing
In addition to cameras, technicians might use smoke testing or colored dye to identify leaks and flow patterns, especially if the source is unclear.
Deciding Between Repair or Replacement
Depending on the damage, you might face a simple fix or require a full pipe replacement. Minor cracks or root invasions can often be repaired, but if the pipe is collapsed or severely corroded, replacement might be the only safe option.
Factors to Consider
Before deciding whether to repair or replace a sewer pipe, it’s important to evaluate a few key factors. Things like pipe material, age, location, and your budget can all affect the best solution. Making the right choice now can save you time, money, and stress later. The most important factors to consider are given below to help you decide confidently.
Factor 1: Pipe Material (PVC, clay, cast iron)
Different pipe materials age and perform differently—PVC is durable and modern, while clay and cast iron are older and prone to issues. Knowing what kind you have helps determine whether a repair will last or if replacement makes more sense. Material also affects the cost and ease of the job.
Factor 2: Pipe Age and Condition
Older pipes, especially those over 40 years old, may be brittle, corroded, or near the end of their life. If damage is just the tip of the iceberg, replacing the whole line is usually the smarter long-term fix. A solid inspection reveals what you’re really working with.
Factor 3: Accessibility
If your pipe is buried under concrete, a large tree, or a building, accessing it for repairs could be expensive or even impossible without trenchless methods. The easier it is to reach, the more affordable and straightforward the repair. Otherwise, it might be better to go trenchless or replace completely.
Factor 4: Cost and Budget
Sometimes it’s cheaper to repair a small section, but if issues keep popping up, you’ll spend more over time. Weigh the immediate cost against future repairs and maintenance. It’s often more budget-friendly in the long run to do it right the first time.
Factor 5: Environmental Impact
Leaking sewer pipes can contaminate soil, water, and even nearby homes. Choosing a solution that seals the system completely, like pipe lining, helps protect the environment. Always factor in how your repair (or delay) affects not just your home, but the area around it.
Types of Sewer Pipe Repair Methods
There are several ways to approach sewer pipe repairs, each with its own pros and cons.
Traditional Excavation Repair
This method involves digging a trench to access and replace the damaged section of the pipe. Though it’s labor-intensive and disruptive, it’s often necessary for severe damage.
Trenchless Sewer Repair
Trenchless methods are less invasive and generally quicker:
- Pipe Lining (Cured-In-Place Pipe – CIPP): A resin-coated liner is inserted into the existing pipe and inflated to harden, sealing cracks and leaks.
- Pipe Bursting: A new pipe is pulled through the old one, breaking the damaged pipe outward while replacing it simultaneously.
Spot Repairs
If only a small section of the pipe is affected, plumbers can replace just that part without redoing the entire line.
DIY Sewer Pipe Repair Tips
If you’re handy and the damage is minor, you might be able to repair your sewer pipe yourself.
Materials You’ll Need
To repair a broken sewer pipe yourself, you’ll need a few essential materials to get the job done right. Each item plays a key role, from cutting and connecting the pipe to sealing and protecting it. The essential materials you’ll need are given below to help you prepare with confidence.
1. PVC or ABS replacement pipes
These are the most commonly used sewer pipe materials today—lightweight, durable, and easy to work with. Choose the same type and diameter as your existing line for a smooth fit. PVC is typically white, while ABS is black—don’t mix them without the right adapter.
2. Pipe couplings and seals
Couplings are used to securely connect new pipe sections to the old ones. Flexible rubber couplings with stainless steel bands are especially helpful for underground repairs. They create a watertight seal that holds up under pressure and prevents leaks.
3. Pipe cutter or hacksaw
You’ll need a clean, straight cut to ensure a tight pipe connection—and a pipe cutter or hacksaw gets it done. A pipe cutter is faster and more precise, but a hacksaw works in tight spots. Either way, sharp tools mean fewer fitting issues later.
4. Rubber gaskets
Gaskets help cushion and seal pipe connections, especially if you’re using non-glued joints. They’re essential for keeping dirt, water, and sewer gases out of the joint area. Make sure they’re the right size for your pipe and coupling.
5. PVC primer and solvent cement
These two products work together to chemically bond PVC pipe and fittings. Primer softens and cleans the pipe, while solvent cement fuses it into a single solid piece. Skipping this step risks leaks or joint failure, so use both properly.
6. Shovel (for digging)
A standard shovel is your best friend when exposing buried pipe. Go slowly and carefully to avoid cracking more of the line or damaging nearby utilities. You may also want a trenching shovel for cleaner, narrower digs.
7. Work gloves and safety goggles
Always protect your hands and eyes while working with sharp tools and chemical adhesives. Gloves prevent cuts and exposure to waste, while goggles protect you from splashes and debris. Safety gear isn’t optional—it’s essential.
Step-by-Step DIY Repair Guide
If you’re confident with tools and want to tackle the repair yourself, following the right process is key. A successful sewer pipe fix requires careful planning, proper materials, and attention to detail at every step. From locating the break to sealing and testing the pipe, each move matters. Follow the step-by-step DIY repair guide given below to ensure a clean, effective, and lasting result.
Step 1: Locate the Damage
Start by identifying where the sewer line is broken. Look for obvious clues like wet or sunken spots in the yard, bad smells, or slow drains in one part of the house. If available, use a sewer camera to avoid unnecessary digging. Pinpointing the break makes everything else easier.
Step 2: Turn Off Water Supply
Before doing anything, turn off the main water supply to stop water from flowing into the damaged pipe. This prevents more mess and makes the repair safer to handle. It’s a quick step that helps you work without added pressure—literally.
Step 3: Excavate the Area
Once you’ve found the break, dig carefully around the pipe to expose it. Give yourself enough room to work, at least a foot on each side of the damaged area. Watch out for roots, rocks, or other underground utilities while digging.
Step 4: Remove the Damaged Section
Cut out the broken piece of pipe cleanly using a hacksaw or pipe cutter. Make sure your cuts are straight to allow the new section to fit tightly. This is where precision really matters—sloppy cuts can cause future leaks.
Step 5: Clean and Prepare Ends
Wipe down the exposed pipe ends to remove any dirt or residue. Then apply PVC primer to prepare the surface for bonding. A clean and properly primed pipe ensures a strong, leak-free seal when you attach the new section.
Step 6: Install New Section
Measure the gap and cut a new pipe section to fit perfectly. Attach it using proper couplings and apply PVC cement to seal the joints. Press the pieces firmly together and hold for a few seconds to let it set.
Step 7: Test the Repair
Once everything’s connected, turn the water back on and check for leaks. Watch closely for any drips around the new section. If it holds up under pressure, congratulations—your repair was successful.
Step 8: Backfill Carefully
After testing, fill the hole back in using the same soil you removed earlier. Compact the dirt gently in layers to avoid dips or future shifting. Finish by restoring any surface materials like grass or gravel to keep things tidy.
Safety Tips for DIY Repair
Before diving into a sewer repair, safety should be your top priority. The essential safety tips you need to follow are given below to help keep your DIY job secure and accident-free.
1. Always wear safety gear
Sewer work can expose you to harmful bacteria, sharp tools, and debris. Wearing gloves, goggles, and protective clothing keeps you safe from cuts, splashes, and contamination. Don’t take shortcuts—gear up before you dig in.
2. Avoid working alone
Even if you’re confident, it’s best not to tackle a sewer repair solo. Having someone nearby can help in case of accidents, heavy lifting, or unexpected emergencies. Two sets of eyes and hands always make the job safer.
3. Be cautious of gas or electric lines
Before digging, always check for underground utilities like gas, water, or electrical lines. Striking one by mistake can be extremely dangerous and costly. Use a local utility marking service or call 811 to locate them first.
4. Know local plumbing codes
Every area has plumbing codes that must be followed for safety and compliance. Doing repairs without knowing the rules can lead to fines or failed inspections. Check with your local building authority or consult a pro before starting.
Cost of Sewer Pipe Repair
Costs vary greatly depending on the method, severity of damage, and your location.
| Repair Method | Estimated Cost |
|---|---|
| DIY Spot Repair | $100 – $500 |
| Traditional Repair | $1,000 – $5,000 |
| Trenchless Repair | $3,000 – $10,000 |
| Full Replacement | $5,000 – $20,000+ |
Keep in mind that early detection can save thousands by avoiding major replacements.
Hiring a Professional Sewer Repair Service
While some fixes are manageable, major repairs are best left to professionals. When hiring a sewer repair contractor:
1. Check licensing and insurance
Before hiring anyone, make sure the contractor is fully licensed and insured. This protects you from legal issues and ensures the work meets local codes. An insured plumber also covers any damage or accidents during the job.
2. Get multiple quotes
Don’t settle for the first estimate you hear—getting 2 or 3 quotes helps you compare pricing and services. Some contractors may offer better value or use more advanced techniques. It’s smart shopping and could save you thousands.
3. Ask for references
A reputable plumber should be happy to provide references from past clients. Talking to others who’ve used their services gives you insight into reliability, quality, and customer service. It’s one of the easiest ways to avoid a bad experience.
4. Review warranties and guarantees
Always ask what kind of warranty comes with the repair work. Good plumbers stand behind their services and products, offering clear guarantees in writing. It gives you peace of mind knowing they’ll fix any issues that come up later.
5. Look for emergency service availability
Sewer problems don’t always happen during business hours. Choose a contractor who offers 24/7 emergency support, especially if you’ve had backups or flooding. Quick response times can prevent further damage and stress.
How to Prevent Future Sewer Pipe Damage
Prevention is always better than repair. These small habits can extend your sewer pipe’s lifespan and minimize unexpected problems. Here’s how to protect your sewer line:
1. Avoid flushing non-degradable items
Things like wipes, paper towels, grease, and hygiene products don’t break down in pipes. Over time, they can clog your sewer line and cause backups or cracks. Stick to flushing only toilet paper and human waste to keep things flowing freely.
2. Use root barriers near trees
Tree roots are one of the top causes of sewer pipe damage. Installing root barriers near sewer lines keeps aggressive roots from creeping in and breaking pipes. It’s a simple landscaping solution that protects your plumbing in the long run.
3. Schedule annual inspections
Even if nothing seems wrong, an annual sewer inspection helps catch issues early. Professionals can spot small cracks, buildup, or root intrusion before they turn into major problems. Think of it as a routine check-up for your home’s health.
4. Avoid parking heavy vehicles over sewer lines
The pressure from cars, trucks, or even trailers can crush underground pipes over time. If you’re not sure where your lines run, get a map from your city or a plumbing inspection. Keeping heavy loads off these areas helps prevent sudden pipe collapse.
5. Install backflow preventers
Backflow preventers stop sewage from flowing back into your home during heavy rains or clogs. They’re especially helpful in flood-prone areas or homes with basement plumbing. A licensed plumber can install one quickly, adding peace of mind during storms.
People Also Asked Questions (FAQs)
How do I know if my sewer pipe is broken?
Common signs include foul odors, slow drains, gurgling noises, and soggy spots in your yard.
Can I repair a sewer pipe myself?
Yes, minor repairs can be done with the right tools and knowledge, but more serious damage should be handled by professionals.
What is the cheapest way to repair a sewer pipe?
Spot repairs or trenchless pipe lining are often cost-effective compared to full replacements.
How long do sewer pipes last?
Depending on the material, sewer pipes can last 50 to 100 years. Regular maintenance can extend their life.
What is trenchless sewer repair?
Trenchless repair fixes pipes without digging large trenches. It includes methods like pipe bursting and cured-in-place pipe lining.
Is a broken sewer pipe an emergency?
Yes, especially if it leads to sewage backups or environmental contamination. Prompt action is critical.