
|
Getting your Trinity Audio player ready...
|
Installing a new toilet can seem like a daunting task, but with the right tools and a little patience, it’s entirely manageable for most homeowners. Whether you’re remodeling your bathroom or replacing a faulty fixture, learning how to install a new toilet is a valuable skill that can save you money and boost your confidence in handling basic plumbing tasks.
New Toilet Installation: Tools and Materials You’ll Need
Before you dive into the installation process, gather all the necessary tools and materials. Preparation is key to avoiding hiccups during the job.
Essential Tools:
- Adjustable wrench
- Putty knife
- Tape measure
- Hacksaw (for trimming bolts if needed)
- Level
- Sponge or wet-dry vacuum
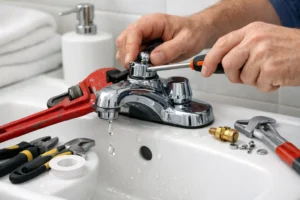
1. Adjustable Wrench
An adjustable wrench is essential for tightening and loosening the water supply line and tank bolts. Its flexibility allows it to fit a variety of nut sizes. A firm grip without over-tightening ensures leak-free and secure connections.
2. Putty knife
Used to scrape off the old wax ring and residue from the toilet flange, the putty knife makes cleanup fast and efficient. It helps create a clean, flat surface for the new wax seal. Choose one with a sturdy, rust-resistant blade for best results.
3. Tape measure
A tape measure helps you confirm that the rough-in distance—the space between the wall and the flange—is suitable for your new toilet. It’s also useful for positioning bolts evenly. Accurate measurements prevent fitting issues and ensure a centered installation.
4. Hacksaw (for trimming bolts if needed)
Sometimes, the closet bolts sticking up from the flange are too long to fit under the cap or cause the toilet to wobble. A hacksaw lets you safely trim them down to size. Be sure to cut carefully to avoid damaging the threads.
5. Level
Using a level ensures your toilet sits evenly on the floor, both front-to-back and side-to-side. A level installation not only looks better but also prevents future wobbling and stress on seals. Always check before and after tightening bolts.
6. Sponge or wet-dry vacuum
After shutting off the water and flushing, residual water remains in the tank and bowl. A sponge or wet-dry vacuum removes this leftover water, preventing spills during removal. It keeps the work area clean and avoids water damage.
Required Materials to Install a New Toilet
- New toilet (bowl and tank)
- Wax ring or rubber gasket
- Closet bolts and washers
- Toilet flange
- Supply line (if not reusing the old one)
- Caulk (optional for sealing base)
1. New toilet (bowl and tank)
This is the core of your installation—most toilets come in two pieces: a bowl and a tank. Choose a model that suits your bathroom size, height preference, and water efficiency needs. Ensure both parts are compatible if purchased separately.
2. Wax ring or rubber gasket
The wax ring or rubber gasket creates a seal between the toilet base and the flange to prevent water and gas leaks. Wax rings are traditional and form a strong seal, while rubber gaskets are reusable and less messy. Both are effective if installed correctly.
3. Closet bolts and washers
Closet bolts anchor the toilet to the floor via the flange, while washers and nuts help secure it in place. New bolts often come with your toilet but always check for quality and fit. Tight, balanced bolts ensure your toilet remains steady and leak-free.
4. Toilet flange
The flange connects the toilet to the drainpipe and holds it firmly to the floor. A properly placed, undamaged flange is crucial for sealing the waste pipe and preventing wobble. If the flange is damaged or at the wrong height, it must be replaced or adjusted.
5. Supply line (if not reusing the old one)
This flexible hose connects your toilet tank to the shut-off valve, supplying clean water. It’s wise to install a new supply line during replacement to prevent leaks from aging or brittle hoses. Choose the correct length and fitting size for a snug connection.
6. Caulk (optional for sealing base)
Caulking around the base of the toilet provides a finished look and prevents water or debris from collecting underneath. Though optional, it also helps stabilize the toilet. Use a mold-resistant, waterproof caulk and apply a clean, even bead around the base.
Having everything ready helps make the process smoother, reducing the risk of delays or surprise trips to the hardware store.
Removing the Old Toilet
Out with the old, in with the new! This first step involves safely and cleanly removing your current toilet.
Turn Off the Water Supply
Find the shut-off valve located behind or near the toilet. Turn it clockwise to stop water flow. Flush the toilet to drain the tank and bowl. Use a sponge or wet-vac to remove any remaining water.
Disconnect and Detach
Unfasten the water supply line from the tank. Then, remove the caps covering the toilet bolts and use your wrench to loosen the nuts. Gently rock the toilet back and forth to break the wax seal and lift it off. Be careful—it can be heavy!
Clean the Flange Area
Scrape away the old wax ring with a putty knife and clean the flange area thoroughly. Inspect for damage. If the flange is cracked or unstable, replace it before continuing.
Setting Up the New Toilet Base
With a clean slate, it’s time to begin installing your new toilet. The base is your foundation, so getting it right is essential.
Install New Closet Bolts
Insert new closet bolts into the flange slots. Use washers or bolt holders to keep them upright during installation.
Position the Wax Ring
Flip the toilet bowl upside down and press a new wax ring (or rubber gasket) onto the bottom outlet. Some prefer placing the wax ring directly onto the flange—both methods are valid.
Lower the Bowl Carefully
Align the bowl over the flange, lining up the bolt holes. Lower it straight down without twisting. Apply even pressure to compress the wax ring and create a watertight seal.
Secure the Bowl
Place washers and nuts onto the closet bolts and tighten them evenly. Avoid over-tightening—this can crack the porcelain. Trim excess bolt length if needed and snap on decorative caps.
Installing the Toilet Tank
Most toilets come in two pieces: the bowl and the tank. Here’s how to safely attach the tank to the bowl.
Install Tank Bolts and Gasket
Insert bolts and a rubber gasket through the tank’s bottom. Position the tank on the bowl, guiding the bolts into the holes.
Tighten and Level
Tighten the tank bolts evenly using a wrench. Alternate sides to keep pressure balanced. Use a level to ensure the tank sits straight and flush.
Reconnect the Water Supply
Attach the water supply line to the tank’s fill valve. Tighten gently with a wrench—avoid stripping the threads.
Finishing Touches and Testing
You’re nearly done! But a few final steps ensure your new toilet functions properly and looks polished.
Turn on the Water
Slowly open the shut-off valve. Allow the tank to fill, then flush the toilet and inspect for leaks around the base, tank bolts, and supply line.
Seal the Base (Optional)
Apply a bead of caulk around the toilet base if desired. This gives a clean finish and prevents water or debris from collecting underneath.
Final Adjustments
Check that the toilet sits firmly and flushes efficiently. Adjust the tank water level if necessary using the float mechanism.
New Toilet Installation Safety Tips
When working with plumbing, a few safety and comfort tips go a long way.
Always wear gloves when handling old toilet components: Old toilets can harbor bacteria, mold, and residue that may pose health risks. Wearing gloves protects your hands from direct contact with contaminants and ensures hygienic handling. It also helps avoid cuts or scrapes from sharp edges or corroded parts.
Use proper lifting techniques—bending at the knees, not the waist: Toilets are heavy and awkward to lift, increasing the risk of back strain or injury. Always bend at your knees and keep your back straight when lifting to maintain good posture and protect your spine. Using proper lifting form makes the job safer and more manageable.
If in doubt, consult a professional plumber: If you’re unsure about any step in the installation process, it’s wise to call a licensed plumber. Attempting complex plumbing without experience can lead to leaks, water damage, or even code violations. A professional ensures the job is done safely and correctly.
Common Mistakes to Avoid When Installing a New Toilet
Avoid these blunders by double-checking each step and using the right tools. Mistakes during installation can lead to costly repairs. Here’s what to watch for:
Incorrect flange height
If the toilet flange is too high or too low relative to the finished floor, it can prevent the toilet from sitting level and sealing properly. This often causes the toilet to rock or leak at the base. Correcting flange height usually involves using flange extenders or making floor adjustments.
Weak wax ring seal
A poorly seated wax ring won’t form a strong watertight seal between the toilet and drainpipe. This can result in slow leaks, odors, or sewage gas escaping into your bathroom. Applying firm, even pressure when setting the toilet ensures a reliable seal.
Overtightening bolts
Tightening the toilet bolts too much can crack the porcelain base or tank, leading to costly damage. The bolts only need to be snug enough to hold the toilet securely in place without rocking. Always tighten evenly and carefully to avoid over-stressing the ceramic.
Skipping the level check
Failing to use a level when installing the toilet can lead to an uneven or tilted installation. A slanted toilet not only looks off but can also affect flushing performance and cause stress on seals over time. Always check level front-to-back and side-to-side before final tightening.
How to Maintain Your New Toilet After Installation
Preventative care ensures your toilet remains problem-free for years. To keep your new toilet running efficiently:
Regularly clean the bowl and tank
Keeping your toilet bowl and tank clean is essential to prevent the buildup of stains, mineral deposits, and bacteria. Regular cleaning not only keeps the toilet looking fresh but also helps it function properly. Use a toilet-safe cleaner and avoid scrubbing with anything too abrasive that might damage the surface.
Inspect bolts and seals annually
Over time, bolts and seals can loosen or wear out, leading to leaks or wobbling. It’s a good idea to inspect these components at least once a year to ensure they’re secure and intact. Replacing worn seals promptly helps maintain a tight, leak-free connection.
Avoid harsh chemicals that can degrade gaskets
Strong chemical cleaners, especially those containing bleach or acid, can break down rubber gaskets and seals inside your toilet. This can lead to premature leaks or malfunctions. Opt for gentler, toilet-safe cleaning products to protect internal components.
Test for leaks occasionally by placing dye in the tank and watching for color in the bowl
To check for silent leaks, add a few drops of food coloring or toilet dye into the tank and wait 10–15 minutes without flushing. If the color appears in the bowl, there’s a leak in the flapper or tank mechanism. Catching this early can save water and prevent higher utility bills.
When to Call a Professional
Sometimes, the cost of professional help outweighs the frustration of trial and error. If you encounter any of the following, consider hiring a licensed plumber:
- Flange damage or complex repairs
- Persistent leaks after installation
- Difficulties with tight spaces or unusual configurations
1. Flange Damage or Complex Repairs
The toilet flange is a critical part that connects your toilet to the drainpipe and anchors it to the floor. If it’s cracked, corroded, broken, or improperly seated, it won’t seal correctly, leading to leaks or instability.
- Signs of flange damage include a rocking toilet, water around the base, or visible cracks.
- Repairing or replacing a flange often involves cutting out old pipework, working with subflooring, or resetting tile, which requires professional tools and expertise.
- If the flange sits too high or too low relative to the floor, special adjustments or flange extenders are needed—again, tasks best left to a pro.
2. Persistent Leaks After Installation
If your toilet continues to leak after you’ve installed it—whether from the base, tank, or supply line—it may indicate a deeper issue:
- Leaks at the base may result from a misaligned wax ring or uneven floor.
- Tank leaks can come from over-tightened bolts, worn gaskets, or cracks.
- Repeated leaks can damage your floor and subfloor over time, leading to mold or structural issues.
A professional plumber can quickly identify and correct these issues using diagnostic tools and proper sealing techniques.
3. Difficulties with Tight Spaces or Unusual Configurations
Some bathrooms have tight clearances, angled walls, or unusual plumbing layouts that make toilet installation tricky.
- In tight spots, even setting the toilet properly can be physically difficult or impossible without the right maneuvering skills or equipment.
- Older homes might have offset drains, non-standard plumbing, or uneven floors, all of which complicate installation.
- Professionals have special tools (e.g., offset flanges, flexible connectors) and experience navigating awkward or custom layouts safely and efficiently.
In short: If the job requires more than straightforward bolt-and-wax-ring work—or if you hit repeated snags—bringing in a pro saves you time, stress, and potential repair costs down the road.
People Also Asked Questions (FAQs)
How long does it take to install a new toilet?
On average, 1–2 hours for experienced DIYers. Beginners may take longer depending on complications.
Can I reuse the wax ring from the old toilet?
No. Wax rings are single-use and should always be replaced to ensure a proper seal.
Do I need to replace the flange?
Only if it’s damaged or too low/high for the new toilet. Inspect before proceeding.
Should I use a wax ring or rubber gasket?
Both work. Wax rings are traditional; rubber gaskets are mess-free and reusable.
Can I install a toilet by myself?

Yes, if you’re comfortable lifting heavy items and following steps carefully. Having a second person helps with positioning.
What should I do if my toilet rocks after installation?
Shim the base using plastic toilet shims and re-tighten bolts gently to stabilize.