
|
Getting your Trinity Audio player ready...
|
Installing a kitchen faucet may seem like a task best left to the professionals, but with the right tools and a bit of patience, it’s a manageable DIY project that can save you time and money. Whether you’re upgrading your old unit, replacing a broken one, or modernizing your kitchen, learning how to install a kitchen faucet is both empowering and rewarding.
Understanding the Faucet Components
Before you dive into the installation process, it’s essential to familiarize yourself with the parts of a kitchen faucet. Knowing what’s what will help you understand where everything fits and reduce the chances of making mistakes during installation.
Basic Faucet Parts You Should Know
Each of these parts plays a critical role in both the functionality and installation of a kitchen faucet. Understanding them makes it easier to troubleshoot issues or install a new faucet correctly.
1. Spout
The spout is the visible, often curved, part of the faucet where the water comes out. It directs the flow of water into the sink. Spouts come in various shapes and styles—like high-arc, pull-down, or straight—to match both functionality and design preferences. It’s essentially the “face” of the faucet.
2. Handles
Handles are what you turn or lift to control the flow and temperature of the water.
- A single-handle faucet adjusts both hot and cold water with one lever.
- A double-handle faucet has two separate controls—one for hot and one for cold.
Handles are directly connected to the cartridge, which controls the internal flow of water.
3. Cartridge
The cartridge is a valve mechanism inside the faucet body. When you move the handle(s), it shifts the cartridge, which then adjusts the flow rate and temperature of the water by mixing hot and cold streams. If a faucet drips or leaks, the cartridge often needs to be replaced.
4. Aerator
Located at the tip of the spout, the aerator is a small mesh screen that mixes air with the water. It helps reduce splashing, controls water pressure, and conserves water by controlling flow without sacrificing pressure. A clogged aerator can cause weak water flow and should be cleaned regularly.
5. Mounting Hardware
This refers to the collection of nuts, washers, screws, and brackets that secure the faucet to the sink or countertop from below. It ensures the faucet stays firmly in place. The mounting hardware varies slightly depending on the type of faucet and the number of holes in your sink.
6. Supply Lines
Supply lines are flexible hoses or pipes that connect the faucet to your home’s hot and cold water valves under the sink. They are usually color-coded (red for hot, blue for cold) and have compression fittings on each end. Without proper supply lines, water can’t reach the faucet.
Tools and Materials You’ll Need
Before starting, gather all necessary tools and materials. This preparation will ensure a smooth and efficient installation process.
Essential Tools List
| Tool | Purpose |
|---|---|
| Adjustable wrench | Tighten nuts and bolts |
| Basin wrench | Reach difficult areas under the sink |
| Plumber’s tape | Seal pipe threads |
| Bucket or towel | Catch residual water |
| Flashlight | Better visibility under the sink |
You’ll also need your new faucet, supply lines (if not included), and potentially silicone sealant depending on your sink configuration.
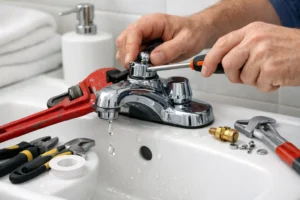
Step-by-Step: 5 Easy Steps On “How to Install a Kitchen Faucet”
Installing a kitchen faucet isn’t as complicated as it seems. With the right approach, you can complete the job in under two hours.
First Step: Preparing the Area
Before removing your old faucet, turn off the water supply and clean the area around the sink. Make sure you have ample lighting and workspace.
Shut Off the Water Supply
- Locate the water shutoff valves under the sink.
- Turn them clockwise until they’re fully closed.
- Open the faucet to release any residual water.
Clear the Cabinet
Remove cleaning supplies, garbage disposals, or other items from the cabinet. Lay down a towel or bucket to catch any drips.
Second Step: Removing the Old Faucet
With your workspace clear and the water turned off, you can now remove the old faucet. This step requires a bit of patience, especially if the fixture has been in place for a long time.
Disconnect Water Supply Lines
Use your adjustable wrench to loosen and remove the hot and cold supply lines from the shutoff valves.
Loosen the Mounting Nuts
Using a basin wrench, reach up behind the sink to loosen the mounting nuts that hold the faucet in place. Remove all washers, nuts, and brackets.
Lift Out the Old Faucet
Once everything is disconnected, lift the old faucet out of the sink. Clean the area thoroughly to remove any debris or old sealant.
Third Step: Installing the New Kitchen Faucet
Now comes the fun part — installing your shiny new faucet. This process will vary slightly depending on whether you have a single-hole or multi-hole sink.
Position the Faucet
Feed the faucet lines through the hole(s) in your sink. Ensure it’s facing the right direction and is centered.
Secure the Faucet
From beneath the sink, attach the mounting hardware — usually a bracket, washer, and nut — to hold the faucet in place. Tighten everything securely using the basin wrench.
Attach Water Supply Lines
Connect the supply lines to the faucet and the shutoff valves. Use plumber’s tape on the threads for a secure seal. Be careful not to overtighten, as it can damage the fittings.
Fifth Step: Testing Your New Faucet
Once your faucet is mounted and connected, it’s time to test the setup for functionality and leaks.
Turn On the Water Supply
Slowly open the shutoff valves and check for leaks at all connections. If you see water dripping, turn off the supply and tighten the fittings as needed.
Flush the Faucet
Remove the aerator from the faucet and turn on both the hot and cold water. Let it run for a few minutes to flush out any debris that may be in the lines. Replace the aerator afterward.
Common Installation Mistakes to Avoid
Many DIYers encounter common pitfalls that can be easily avoided with a bit of foresight.
Don’t Skip Plumber’s Tape
Plumber’s tape helps create a watertight seal. Skipping it can lead to annoying drips and potential damage.
Ensure Tight But Not Overtightened Connections
Too loose, and you risk leaks. Too tight, and you could crack a fitting. Find the sweet spot with moderate force.
Level the Faucet Properly
Before tightening everything fully, ensure the faucet is level and facing the right direction.
Different Faucet Types and Their Installation Nuances
Understanding your specific faucet type can make the installation much easier. Here’s a quick guide:
| Faucet Type | Installation Notes |
|---|---|
| Single-handle | Easier to install, requires one hole |
| Two-handle | Needs more holes, more components |
| Pull-down | Hose needs space beneath sink |
| Touchless | Requires power supply (batteries or plug-in) |
Maintaining Your Kitchen Faucet
Once installed, regular maintenance can prolong your faucet’s life and performance.
Clean Regularly
Wipe down the faucet with a mild soap solution to remove water spots and grime.
Check for Leaks
Inspect the supply lines and base periodically for signs of wear or leaks.
Replace Cartridges or Aerators
Over time, these internal components can wear out. Replacing them is a quick fix to maintain flow and prevent drips.
Three Benefits of DIY (Do It Yourself) Faucet Installation
Installing your own faucet offers more than just financial savings. It’s a practical skill that boosts your confidence and adds to your DIY toolkit.
1. Cost Savings: Avoid service fees from a plumber
Hiring a professional plumber can be expensive. Depending on your location and the complexity of the job, installation alone might cost $100–$300 or more. By installing the kitchen faucet yourself, you eliminate those labor charges and only spend on the faucet and any necessary tools or materials. It’s a great way to stay on budget—especially for homeowners who like to save money on basic home improvements.
2. Convenience: Work on your schedule
When you do it yourself, there’s no need to wait for a plumber’s availability. You don’t have to schedule appointments, stay home from work, or rearrange your day. You can install the faucet whenever it’s most convenient for you—be it an early morning, evening, or weekend. That flexibility makes DIY installation appealing for busy households.
3. Satisfaction: Enjoy the fruits of your labor
There’s a sense of pride and accomplishment that comes with fixing or upgrading something in your own home. Once the faucet is installed and working perfectly, you’ll feel a rewarding satisfaction knowing you did it yourself. It builds confidence for future projects and gives you a deeper connection to your space.
People Also Asked Question (FAQs)
How do I know if my faucet is leaking?
 1")
Look for moisture around the base or under the sink. Also, listen for dripping sounds even when the faucet is off.
How long does it take to install a kitchen faucet?
With the right tools and preparation, most installations take 1 to 2 hours.
Do I need a plumber to install a faucet?
Not necessarily. If you’re comfortable with basic tools and follow a guide, it’s a manageable DIY project.
Can I reuse my old supply lines?
It’s generally better to replace them, especially if they’re older, to prevent leaks.
What type of faucet is easiest to install?
Single-handle faucets are typically easier and quicker to install compared to dual-handle or touchless models.
What do I do if I encounter rusted mounting nuts?
Apply penetrating oil and let it sit for a few minutes. If that fails, use a hacksaw or call in a professional.