
|
Getting your Trinity Audio player ready...
|
Quick Answer: To fix a leaky faucet, turn off the water supply, disassemble the faucet, inspect and replace worn washers or cartridges, and reassemble. Most leaks are caused by worn-out rubber washers, O-rings, or faulty cartridges.
Pro Tip: The most common fix for a leaky faucet is replacing a worn washer or cartridge. Turn off water first, and match replacement parts exactly to your faucet model.
Drip… drip… drip. That persistent sound is more than an annoyance—it’s a sign your faucet needs fixing. A leaky faucet doesn’t just drive you crazy; it wastes water, hikes up your utility bill, and can even damage your fixtures over time. But here’s the good news: you don’t need to be a plumbing expert to solve the problem. With a few basic tools and a little patience, you can learn how to fix a leaky faucet all by yourself.
Understanding Faucet Leaks
A faucet might start leaking for a variety of reasons—worn-out washers, loose parts, mineral buildup, or a faulty cartridge. Identifying the type of faucet you have is the first step in determining the proper fix.
Types of Faucets
Different faucets have unique mechanisms and, therefore, different repair methods. Here are the main types:
- Compression Faucets – Use rubber washers to control water flow. Prone to wear and tear.
- Ball Faucets – Single handle that controls a rotating ball inside the body.
- Cartridge Faucets – Dual handles with replaceable cartridges.
- Ceramic Disk Faucets – Durable and long-lasting, with a wide cylindrical body.
Identifying your faucet type will guide your repair strategy.
Why You Should Fix That Drip Now
Ignoring a leaking faucet can cost you in more ways than one.
- Water Waste: A faucet that drips once per second can waste over 3,000 gallons a year.
- Higher Bills: More water used equals higher monthly costs.
- Mold Growth: Leaks can lead to damp areas, fostering mold and mildew.
- Fixture Damage: Constant dripping erodes parts and finishes over time.
Taking quick action to fix a leaky faucet helps preserve resources and your wallet.
Before Starting, Gather the Following Tools and Materials:
Tools and Materials You’ll Need
- Adjustable wrench
- Phillips and flathead screwdrivers
- Replacement washers or cartridges
- Plumber’s tape (Teflon tape)
- Pliers
- Allen wrench (for set screws)
- Cleaning cloths
- Vinegar (for mineral deposits)
Having the right gear makes the process smoother and more efficient.
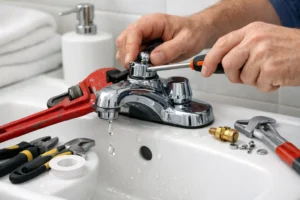
Step-by-Step Guide on How to Fix a Leaky Faucet
Let’s walk through how to fix a leaky faucet, step by step. This process is primarily for compression and cartridge faucets, but the logic applies to most types.
Turn Off the Water Supply
Locate the shut-off valves under the sink and turn them clockwise to stop the water. Then open the faucet to drain any remaining water.
Plug the Drain
Use a sink plug or cloth to block the drain. This prevents small parts like screws and washers from falling in during the repair.
Disassemble the Faucet
Carefully remove the handle using a screwdriver or Allen wrench. Take note of the order and placement of each part for easy reassembly.
Inspect and Remove Faulty Components
Check for worn-out washers, O-rings, or damaged cartridges. Replace with matching parts from a hardware store. Bring the old parts with you to ensure a perfect fit.
Clean the Faucet Components
Soak parts in vinegar to remove mineral deposits and scrub gently with a brush. Clean the faucet body before reassembly to ensure a smooth fit.
Reassemble the Faucet
Reinstall all parts in the reverse order of disassembly. Use plumber’s tape on threads for a tight seal. Don’t overtighten—snug is sufficient.
Turn the Water Back On and Test
Slowly turn the water back on and test the faucet. Look for leaks and ensure smooth operation. If the leak persists, recheck parts for correct installation.
Fixing Leaks in Different Types of Faucets
Each faucet type may require a different approach.
Compression Faucet Leaks
Usually caused by a worn rubber washer inside the valve seat. Replace the washer and consider replacing the valve seat if it’s corroded.
Ball Faucet Leaks
These are complex and often require a faucet repair kit that includes all seals and springs. Follow the manufacturer’s instructions.
Cartridge Faucet Leaks
Leaky cartridge faucets typically need the cartridge replaced. Ensure you get an exact match by checking the make and model of your faucet.
Ceramic Disk Faucet Leaks
These are rare but usually involve replacing the seals. Be careful not to damage the ceramic disks during disassembly.
Preventing Future Faucet Leaks
Preventative maintenance goes a long way:
- Avoid Over-tightening: Turn handles off firmly but not too hard.
- Regular Cleaning: Remove lime scale buildup with vinegar.
- Replace Washers Periodically: Especially in high-use areas.
- Install Water Softeners: Reduces mineral deposits in hard water zones.
A little attention now can save big headaches later.
Is It to Replace A Kitchen Faucet…?
Whether your faucet is leaking, outdated, or you simply want a fresh look for your kitchen, learning how to replace a kitchen faucet can be a rewarding and cost-effective DIY project. Although it may sound intimidating, the process is straightforward with the right tools, a bit of patience, and this detailed guide.
Understanding the Importance of Replacing a Faucet
A kitchen faucet is more than a water spout. It’s a central piece of your kitchen’s functionality and design. A malfunctioning or unsightly faucet can disrupt your daily routine and affect the kitchen’s overall appeal. Knowing how to replace kitchen faucet components empowers you to make quick fixes and enhance your space without hiring a plumber.
When Should You Replace Your Kitchen Faucet?
You might need to replace your faucet if:
- It’s leaking or dripping constantly.
- You notice rust or corrosion.
- Water pressure is low or uneven.
- The faucet design is outdated or doesn’t match your kitchen decor.
- Handles or sprayer are broken or loose.
When to Call a Plumber
Not every faucet issue can—or should—be a DIY project. Call a professional if:
- The leak persists after multiple repairs
- You notice low water pressure
- The leak is from the base or underneath the sink
- You’re unsure about the faucet type or internal parts
It’s better to invest in professional help than risk further damage.
Eco-Friendly Reasons to Fix a Faucet
Repairing a leaky faucet is an environmentally conscious move. Conserving water helps protect ecosystems, reduce energy use, and lower greenhouse gas emissions linked to water heating.
Cost Breakdown: DIY vs. Hiring a Plumber
| Item | DIY Cost (Estimate) | Plumber Cost (Estimate) |
|---|---|---|
| Washer or Cartridge | $2 – $10 | Included in service fee |
| Basic Tools (one-time) | $20 – $40 | — |
| Total | $30 – $50 | $75 – $150+ |
DIY is clearly cheaper if the job is straightforward, but professionals bring speed, expertise, and warranty-backed work.
Is It to Replace A Leaky Bathtub Faucet…?
That constant drip-drip-drip from your bathtub can be more than just annoying—it can waste gallons of water and spike your utility bills. Learning how to fix a leaky bathtub faucet not only saves you money but also empowers you to take control of simple home repairs. This comprehensive guide walks you through everything you need to know to silence that stubborn leak and restore your faucet to proper working condition.
Understanding the Anatomy of a Faucet
Before grabbing your wrench, it helps to understand what you’re working with. Faucets may look simple on the outside, but inside, they contain several moving parts—each of which could be the culprit behind a leak.
Types of Bathtub Faucets
- Compression Faucets: Common in older homes, these use rubber washers to seal the valve.
- Cartridge Faucets: Feature a movable stem cartridge; found in most modern bathrooms.
- Ball-Type Faucets: Have a single handle that moves over a rounded ball.
- Ceramic-Disk Faucets: Use a pair of ceramic disks to control the flow.
Identifying your faucet type is crucial because the repair method varies based on design.
Common Causes of a Leaky Bathtub Faucet
Leaks don’t just happen out of nowhere. Here are the usual suspects behind a dripping faucet:
- Worn-out washers or O-rings
- Corroded valve seat
- Loose parts
- Damaged cartridge
Pinpointing the source of the problem allows for a quicker, more efficient repair process.
Turn Off the Water Supply
Safety first! Always shut off the water supply to avoid turning your bathroom into a water park.
- Look for shutoff valves under the sink or behind a panel.
- If none are accessible, turn off the main water supply.
- Open the faucet to drain residual water.
Remove the Faucet Handle
Once the water is off, you’ll need to disassemble the faucet:
- Use a screwdriver or Allen wrench to remove the handle.
- If it’s stuck, apply gentle heat or vinegar to loosen mineral buildup.
- Set aside all screws and components in a safe place.
Inspect and Replace Faulty Components
Now comes the moment of truth—identifying what’s causing the leak.
Check the Washer and O-Ring
- Remove the stem or cartridge.
- Examine the rubber washer and O-ring for cracks or flattening.
- Replace with identical, properly-sized parts.
- Apply faucet grease to new components for smooth installation.
Clean the Valve Seat
If mineral deposits are present, clean the valve seat with vinegar or a soft brush. A corroded valve seat may require resurfacing with a seat grinder or complete replacement.
Reassemble the Faucet
Once all faulty components are replaced:
- Reinsert the stem or cartridge.
- Secure the handle and other parts.
- Wrap threads with Teflon tape to ensure a tight seal.
- Tighten everything carefully to avoid cracking.
Fixing a Leaky Bathtub Faucet
Fixing a leaky bathtub faucet may seem daunting, but with the right approach, it’s entirely manageable. Whether you’re replacing a washer, cleaning mineral buildup, or installing a new cartridge, the satisfaction of a job well done is worth the effort. Plus, think of the money and water you’re saving—win-win!
People Also Asked (FAQs)
How do I know what type of faucet I have?
Check under the sink or on the body for brand markings. Also, observe the handle mechanism—this can indicate the faucet type.
How do I know if my faucet has a leak?
Check under the sink after installation. Use a dry paper towel to detect even minor drips.
What causes a leaky bathtub faucet?
A leaky faucet is usually caused by worn-out washers, cartridges, O-rings, or mineral buildup inside the valve seat.
How long does it take to replace a kitchen faucet?
Typically, it takes about 1–2 hours for someone with basic DIY skills.
Can I install a kitchen faucet without a sprayer?
Yes, you can choose a faucet without a sprayer or purchase a model with a built-in pull-out sprayer.
Is it necessary to use plumber’s putty?
It depends on the faucet. Some come with a gasket that doesn’t require putty, while others may benefit from the extra seal.
Can I fix a faucet without turning off the water?
No. Always shut off the water to prevent flooding and ensure a safe repair environment.
How long does it take to fix a leaky faucet?
A simple repair typically takes 30 minutes to an hour, depending on your skill level and the faucet type.
Is it cheaper to repair or replace a faucet?
Repair is usually cheaper. Replace only if the faucet is very old or damaged beyond repair.
What causes faucet washers to wear out?
Overuse, high water pressure, and mineral buildup are common culprits.
Can a leaky faucet increase your water bill significantly?
Absolutely. Even a slow drip can waste thousands of gallons annually, spiking your bill.