
|
Getting your Trinity Audio player ready...
|
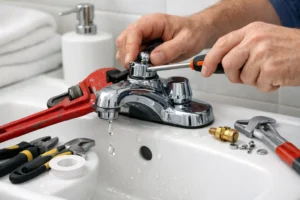
From dripping kitchen sinks to leaky bathroom basins, leaky faucets are a common problem that wastes resources and raises your water bills. But fixing them is a bit of a challenge. After turning off the main water valve, you should dismantle the faucet before replacing worn-out washers and damaged cartridges. If you’re looking to understand How to fix a leaky faucet on your own, the following blog gives you detailed instructions depending on faucet type and also supplies preventive recommendations like not over-tightening the handles and conducting routine inspections to help you avoid leaks in the future.
Fast & Easy Faucet Fixes: Handling Leaks Like A Pro
According to an estimate, a leaky faucet can waste up to 10,000 gallons of water, not to mention the annoying sound of the constant dripping. So when you spot a leaky faucet, it’s important to try to fix it. While only professional plumbers can perform efficient repairs for major issues, small problems can be remedied by homeowners with the right guidance.
Here is how to fix a leaky faucet, depending on its type
Compression Faucets
These faucets have two handles for hot and cold water, making it easy to customize the temperature to your unique preference. If you’ve got a leaky compression faucet, you should:
- Shut Off The Water Supply: Turn the main or local valve to cut off the supply
- Plug The Sink Drain: A crucial step to ensure that you don’t lose any screws or nuts as you work
- Remove Handle: Use a screwdriver tocarefully prye the handle off.
- Access Stem: Next, unscrew the packing nut with an adjustable wrench and pull it out
- Replace Parts: Replace the damaged washer and the O-ring with new ones
- Lubricate: Use plumbers’ grease to lubricate the new parts before reassembling the faucet.
Single-Handle Faucets
On the other hand, if you’ve got a modern single-handle faucet, the leak repair method will be entirely different after the initial steps. If it’s a modern sink that’s leaking, here is what you should do:
- Turn Off Water Supply: Twist the local or main valve clockwise to shut off the water.
- Cover The Drain: To keep from losing anything important
- Remove Cap: Next, remove the decorative cap before the handle screw
- Access Interior: Lift off the decorative cap to get to the cartridge or ball mechanism
- Replace Parts: Lift out the cartridge or ball assembly and install new ones, ensuring proper orientation
- Reassemble: Put everything back the way it was, and you’re done.
Maintenance Tips To Avoid Leaks & Drips: What Every Homeowner Should Do
Okay, now that your faucet is back to its previous non-drippy self, you might be thinking if there’s anything you can do to prevent leaks from happening in the first place. While eventual component damage is unavoidable, there are some things that you should follow to ensure that all your hard work doesn’t go to waste.
Here are all the things you should do for leak prevention.
Avoid Tightening
We know you’re trying to turn off the faucet properly, but there’s no reason to use all that force. Overtightening the nobs just leads to washer and seal damage, which is what leads to leaks in the first place.
Clean Aerator
Minerals like calcium can clog the aerator screen, leading to poor water flow or erratic sprays. Routinely remove it and soak it in mild detergents to eliminate all the build-up.
Routine Inspections
It’s a good idea to check up on the state of your faucet. If you find any damaged components, timely replacements can prevent leaks or worse damage.
Check Water Pressure
Residential properties should only receive a water pressure between 40-60 PSI. If it’s too high, it could strain your faucet and lead to leaks. Have this problem fixed for faucet maintenance.
Conclusion
To conclude, a faucet can leak due to things like worn-out components and high water pressure, leading to thousands of gallons of wasted water and high bills. While we recommend seeking out expert plumbers for faucet leak repairs, if you want to fix them yourself, you should start by turning off the main water supply before applying one of the techniques mentioned above, depending on the type of your faucet. We hope this blog helped you learn how to fix a leaky faucet. Make sure not to overtighten the handles and conduct routine inspections to prevent future leaks.
FAQs
How long does a leaky faucet repair take?
A simple repair can usually be done in under an hour.
How much does a new faucet installation cost?
Depending on quality and location, a new faucet can cost between $450 and $800 to install.
How do I clean my faucet?
Use a water and dish soap mixture to wipe away water stains and dirt from your faucet.